
What the Dead Bug Exercise Is
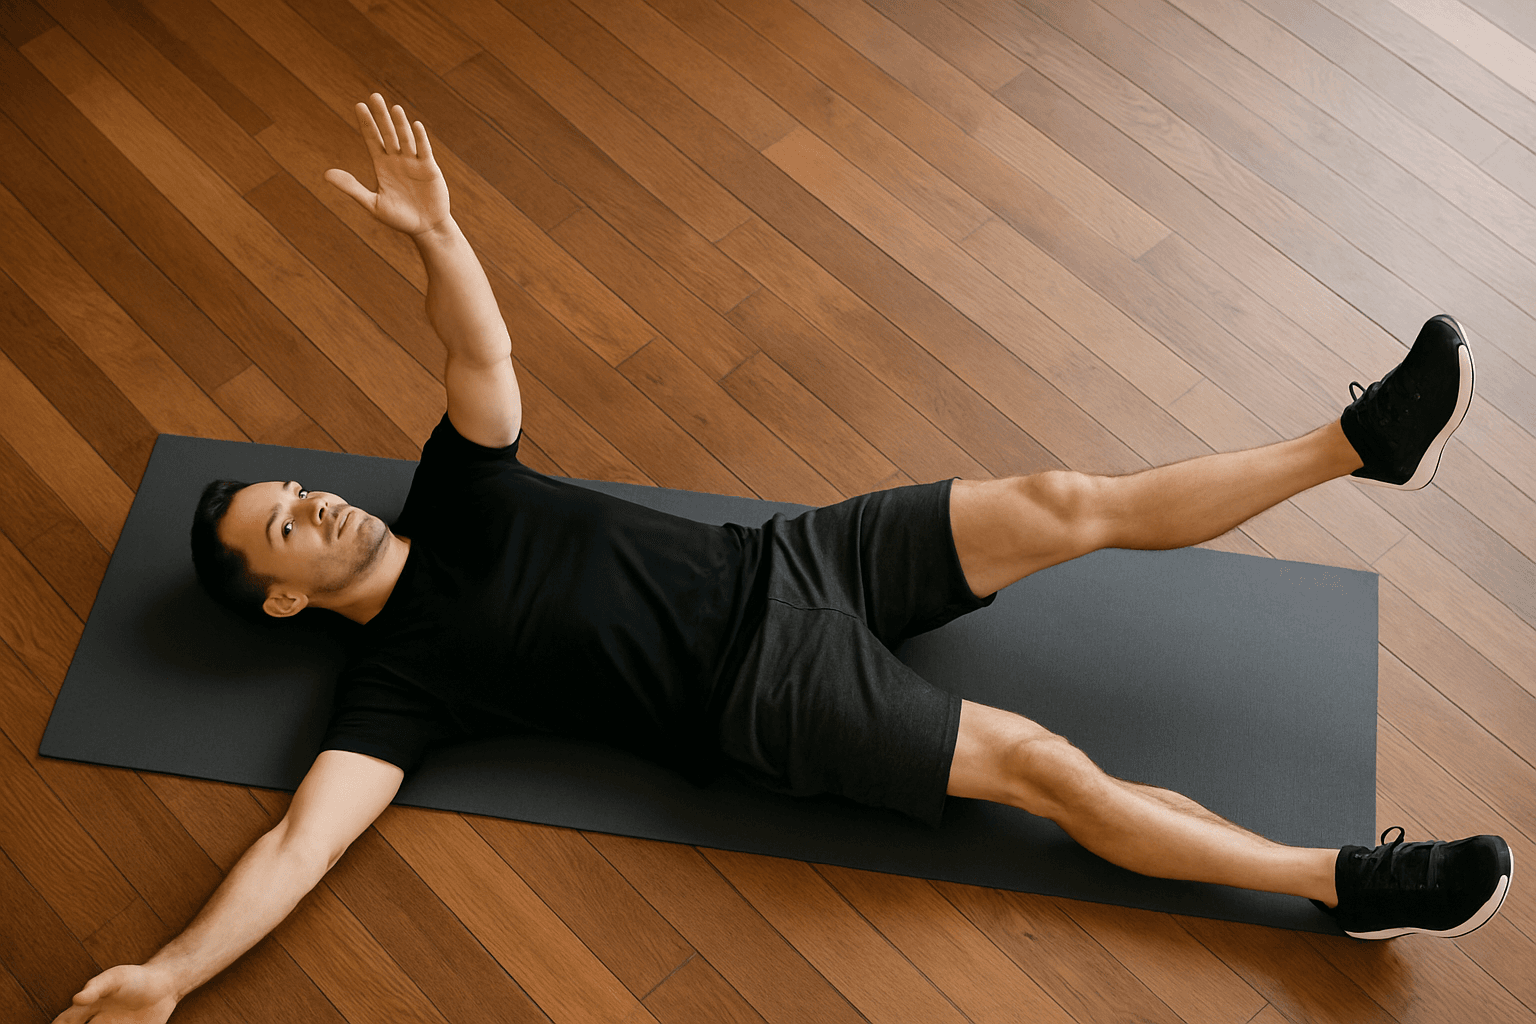
The dead bug is a supine core stability exercise where you lie on your back with your arms and legs in the air, then slowly extend opposite limbs toward the floor while keeping your lower back pressed flat. The name comes from the starting position: you look like a bug that has been flipped on its back.
It sounds simple. It is not. Done correctly, the dead bug is one of the most challenging and most effective core exercises in corrective exercise. It trains the exact stabilization pattern that most people are missing, and it does it without putting a single pound of compressive force on the spine.
For the full exercise breakdown, visit the Dead Bug exercise page.
Dead Bug vs Crunches: Which Is Better for Core Stability?
To understand why the dead bug is superior, you need to understand what your core actually does for posture.
Your core muscles are not primarily designed to flex the spine forward (the crunch movement). Their primary job is to stabilize the spine against forces that try to move it. When you walk, your core resists rotation. When you carry something, your core resists side-bending. When you reach overhead, your core resists extension.
This last pattern - resisting extension, keeping the lower back from arching - is the one that matters most for posture. Anterior pelvic tilt, lumbar hyperlordosis, and rib flare are all failures of anti-extension stability. The hip flexors and gravity are pulling the spine into an arch, and the core is not strong enough to resist.
Crunches do not train this pattern at all. They train spinal flexion, which is the movement most people already have too much of from sitting hunched over all day. Crunches strengthen the rectus abdominis (the "six-pack" muscle) in a shortened position while completely ignoring the transversus abdominis and internal obliques that actually hold the spine stable.
The dead bug trains anti-extension directly. Every rep challenges the core to maintain a flat back while the limbs create a progressively larger extension force. This is exactly the skill your core needs for posture, for lifting, and for daily life.
Here is the direct comparison:
Spinal loading: Crunches repeatedly flex the lumbar spine under load. Research by Dr. Stuart McGill showed that repeated spinal flexion is one of the primary mechanisms for disc herniation. Dead bugs keep the spine neutral throughout, with zero compressive or flexion load.
Muscles trained: Crunches primarily target the rectus abdominis in a shortened range. Dead bugs train the transversus abdominis, internal obliques, and rectus abdominis simultaneously in a functional stabilization pattern.
Posture carryover: Crunches reinforce the rounded, flexed position most people are already stuck in from sitting. Dead bugs train the exact anti-extension pattern that corrects anterior pelvic tilt and rib flare.
Scalability: Crunches are essentially one movement with minor variations. Dead bugs scale from beginner heel taps to advanced banded variations, making them appropriate for rehabilitation through advanced training.
If you are doing crunches for core strength, switch to dead bugs. You will build more functional stability, protect your spine, and directly improve your posture.
How to Do It: Step-by-Step
Starting Position
- Lie on your back on a firm surface.
- Raise both arms straight up toward the ceiling, directly over your shoulders.
- Lift both legs so your hips and knees are at 90 degrees (shins parallel to the floor).
- Press your lower back firmly into the floor. This is the most important cue. You should be able to feel the contact between your lumbar spine and the ground. There should be no gap.
- Take a breath in. As you exhale, feel your ribs draw down toward your hips. Maintain this ribcage position throughout.
The Movement
- Slowly extend your right arm overhead (toward the floor behind you) and your left leg straight out (toward the floor in front of you) simultaneously.
- Lower both limbs as far as you can while keeping your lower back absolutely flat on the floor. The moment you feel your back start to arch, that is your current range of motion. Stop there.
- Return both limbs to the starting position with control.
- Repeat on the opposite side: left arm and right leg.
- Alternate sides for the prescribed number of reps.
Breathing
Exhale as you extend the limbs. Inhale as you return to the starting position. The exhale engages the deep core and helps maintain the flat-back position during the hardest part of the movement.
Tempo
Slow is better. Take 2 to 3 seconds to extend, pause for 1 second at the bottom, and take 2 seconds to return. Fast reps allow momentum to take over and reduce the core's workload. You want the core working through the entire range, not just at the endpoints.
Free - 60 seconds
Not sure which program you need?
Take the free posture quiz and get a personalized recommendation based on your pain and goals.
Progressions: From Beginner to Advanced
The dead bug is infinitely scalable. Here is the progression I use with clients.
Level 1: Heel Taps
From the starting position (arms up, legs at 90/90), keep your arms still and simply lower one heel to tap the floor. Return it and repeat on the other side. The knee stays bent throughout, which shortens the lever arm and makes the exercise significantly easier. This is where everyone should start to establish the flat-back pattern.
When to progress: You can do 3 sets of 12 reps per side with perfect flat-back contact.
Level 2: Standard Dead Bug
The full version described above: opposite arm and leg extend simultaneously. The straight leg creates a much longer lever arm, dramatically increasing the core demand.
When to progress: You can do 3 sets of 10 reps per side with no back arching and controlled tempo.
Level 3: Slow Eccentric Dead Bug
Same movement, but take 5 full seconds to lower the limbs and 2 seconds to return. The extended time under tension is significantly more challenging for the stabilizers.
When to progress: You can do 3 sets of 8 reps per side at the slow tempo.
Level 4: Weighted Dead Bug
Hold a light dumbbell or medicine ball (3 to 8 pounds) in the moving hand. The added weight increases the extension force the core must resist. Keep the weight light - this is a stability exercise, not a strength exercise. If the weight causes your form to break down, it is too heavy.
Level 5: Banded Dead Bug
Attach a resistance band to a fixed point behind your head and hold it in both hands at the starting position. The band creates a constant pull toward extension that the core must resist throughout the entire rep. This variation is the closest the dead bug gets to real-world anti-extension demands.
If you are dealing with anterior pelvic tilt or lower back pain and want a structured program that integrates dead bugs with the full corrective sequence, take the free posture quiz to find the right starting point.
Common Mistakes
1. Lower Back Lifting Off the Floor
This is the most common mistake and it defeats the entire purpose of the exercise. If your back arches, your hip flexors and spinal erectors are doing the work instead of your core. Regress to an easier variation or reduce your range of motion.
2. Ribs Flaring
If your lower ribs push upward toward the ceiling, you have lost your core brace. Think about drawing the front of your ribcage down toward your pelvis. The exhale cue helps here - a full exhale naturally pulls the ribs into a better position.
3. Moving Too Fast
Speed hides instability. When you move fast, momentum carries the limbs and the core gets a free ride during the hardest portion of the movement. Slow down. If the exercise feels easy, you are probably going too fast.
4. Holding Your Breath
Breath-holding creates intra-abdominal pressure that artificially stabilizes the spine. It makes the exercise feel easier but prevents the deep core muscles from learning to stabilize on their own. Breathe continuously: exhale on the exertion (the extension), inhale on the return.
5. Neck Straining
Your head stays on the floor throughout the exercise. If you find yourself lifting your head or tensing your neck, place a small towel under your head for support and focus on keeping the neck relaxed.
Who Benefits Most
The dead bug is universally useful, but certain populations benefit the most:
People with anterior pelvic tilt - the dead bug directly trains the anti-extension pattern that is failing in anterior pelvic tilt. It teaches the core to hold the pelvis level.
People with lower back pain - because there is zero spinal compression and zero flexion loading, the dead bug is one of the safest core exercises for people with disc issues, facet irritation, or general lumbar sensitivity.
Postpartum women - the dead bug is one of the best exercises for rebuilding core stability after pregnancy, particularly for restoring transversus abdominis function.
Athletes - anti-extension stability is foundational for throwing, swinging, running, and every rotational sport. The dead bug builds it without beat-up joints.
Desk workers - if you sit all day, your deep core muscles are dormant. The dead bug wakes them up and teaches them to stabilize the spine again.
How It Fits Into a Corrective Routine
The dead bug works best after hip flexor release and glute activation. In a corrective sequence, that typically looks like:
- Static Back (to deactivate hip flexors)
- Supine Groin Stretch (to release hip flexors)
- Glute Bridges (to activate glutes)
- Dead Bugs (to lock in core stability)
This order matters. Releasing the hip flexors first removes reciprocal inhibition so the core can activate fully. Activating the glutes ensures the pelvis has posterior support. Then the dead bug trains the core to stabilize the corrected position.
For a structured program that integrates the dead bug with the full corrective sequence, check out the Anterior Pelvic Tilt Fix program or the Core Stability program. If you are unsure which program is right for you, the free posture quiz will point you in the right direction.

Mike Boshnack
Corrective Exercise Specialist · Posture Guy Mike
Mike Boshnack grew up skateboarding and surfing, trained MMA, and rode road bikes competitively. A shoulder injury put him on a path to discover corrective exercise. He has since helped thousands of people fix the structural patterns causing their pain, without surgery or passive treatments.
Keep Reading
Corrective Method
Why Your Ankles Are Stiff (And How They're Wrecking Your Squat and Your Posture)
4 min read
Corrective Method
Pigeon Pose for Hip Pain: What It Actually Releases and What It Misses
4 min read
Corrective Method
Side Plank for Posture: Fix the Lateral Weakness Behind Your Hip Shift
4 min read
Related Programs
Free tool
See where your posture stands right now.
Upload a photo and get an instant AI-powered posture analysis with personalized recommendations. Free, no account required.
Try the Free Posture CheckTake the next step
Fix the structural root cause, not just the symptom.
Mike's programs apply this corrective method to your specific condition. No gym, no equipment. Just a floor and 15 minutes. Buy once, own forever.
Discussion
Discussion is a Pro member feature. Visit the community for more.